 Flume高级进阶
# 第 3 章 Flume 进阶
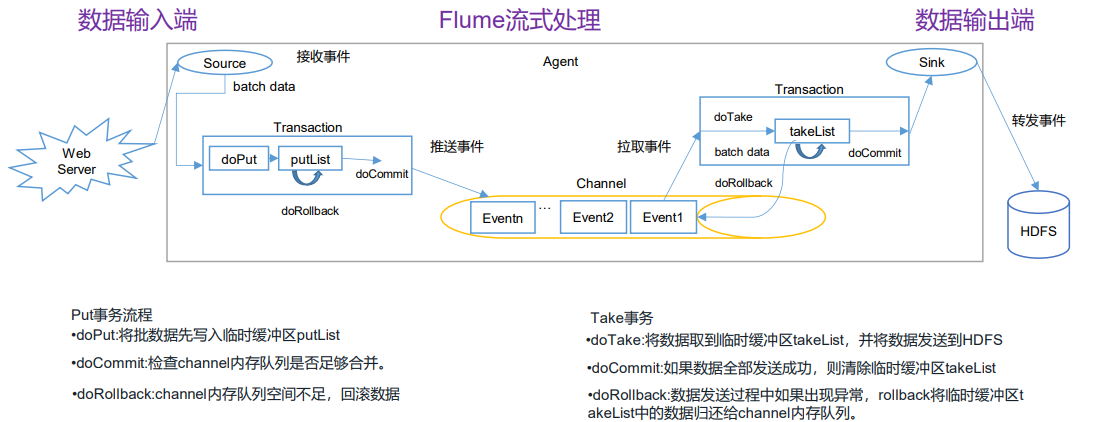
# 3.1 Flume 事务
# 3.2 Flume Agent 内部原理
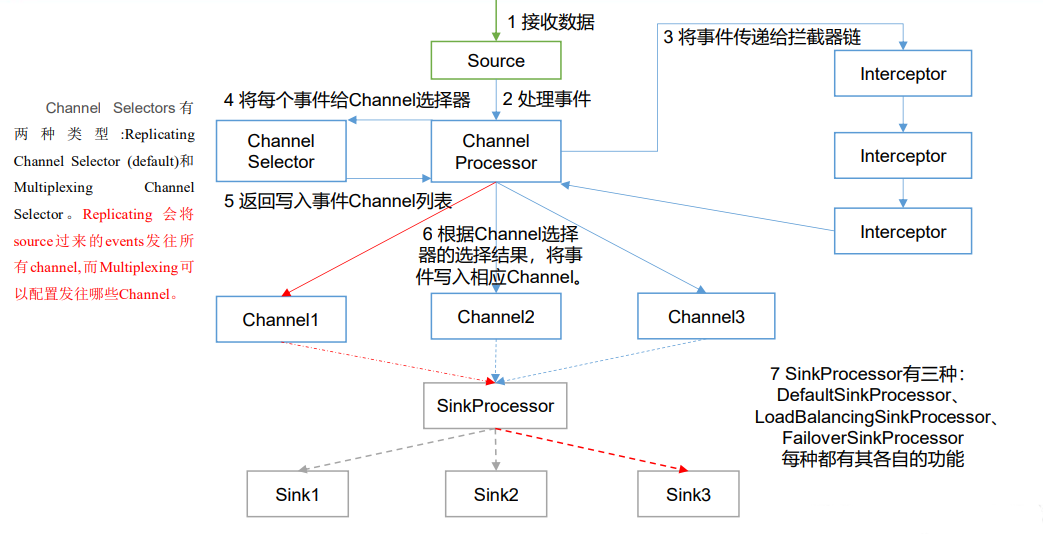
重要组件:
# 1)ChannelSelector
ChannelSelector 的作用就是选出 Event 将要被发往哪个 Channel。其共有两种类型, 分别是 Replicating(复制)和 Multiplexing(多路复用)。
ReplicatingSelector 会将同一个 Event 发往所有的 Channel,Multiplexing 会根据相应的原则,将不同的 Event 发往不同Channel。
# 2)SinkProcessor
SinkProcessor 共 有 三 种 类 型 , 分 别 是 DefaultSinkProcessor 、 LoadBalancingSinkProcessor 和 FailoverSinkProcessor
DefaultSinkProcessor 对 应 的 是 单 个 的 Sink , LoadBalancingSinkProcessor 和 FailoverSinkProcessor 对应的是 Sink Group,LoadBalancingSinkProcessor 可以实现负载均衡的功能,FailoverSinkProcessor 可以错误恢复的功能。
# 3.3 Flume 拓扑结构
# 3.3.1 简单串联
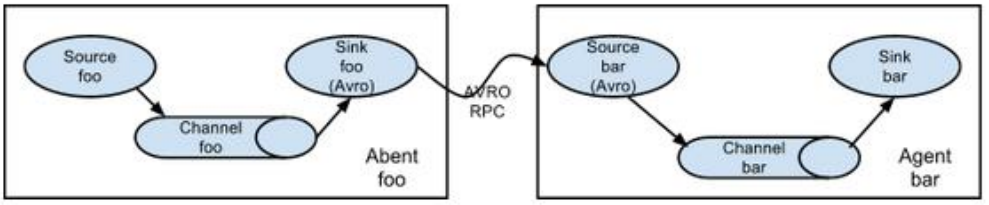
这种模式是将多个 flume 顺序连接起来了,从最初的 source 开始到最终 sink 传送的目的存储系统。此模式不建议桥接过多的 flume 数量, flume 数量过多不仅会影响传输速率,而且一旦传输过程中某个节点 flume 宕机,会影响整个传输系统。
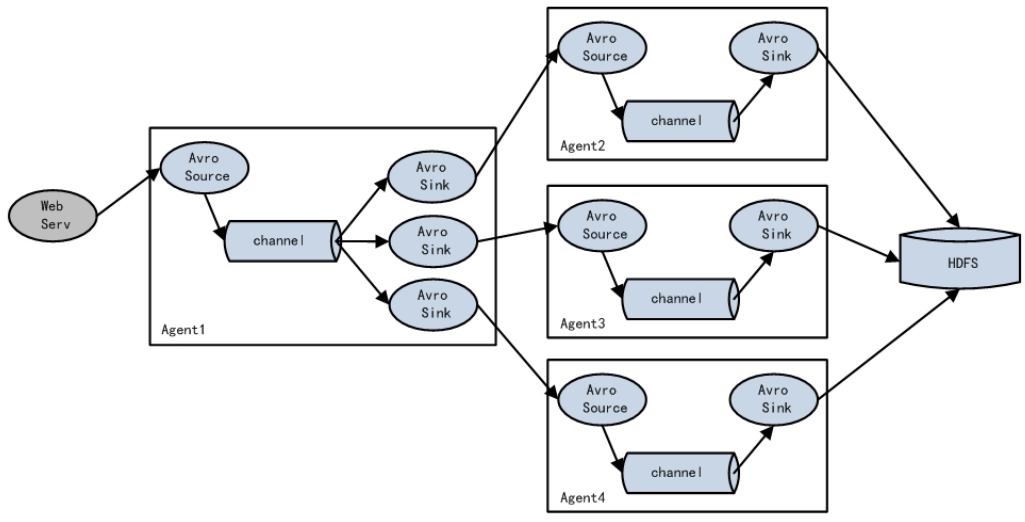
# 3.3.2 复制和多路复用
Flume 支持将事件流向一个或者多个目的地。这种模式可以将相同数据复制到多个 channel 中,或者将不同数据分发到不同的 channel 中,sink 可以选择传送到不同的目的地。
# 3.3.3 负载均衡和故障转移
Flume支持使用将多个sink逻辑上分到一个sink组,sink组配合不同的SinkProcessor 可以实现负载均衡和错误恢复的功能。
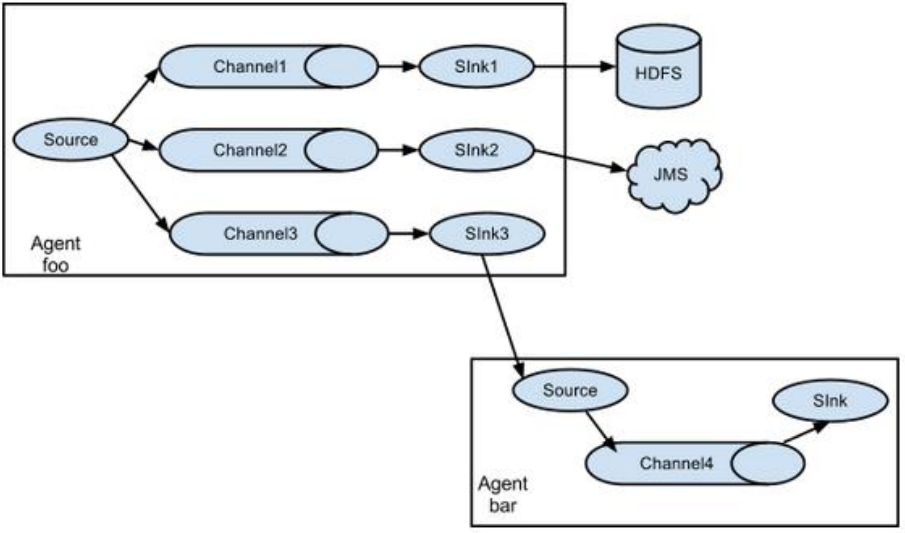
# 3.3.4 聚合
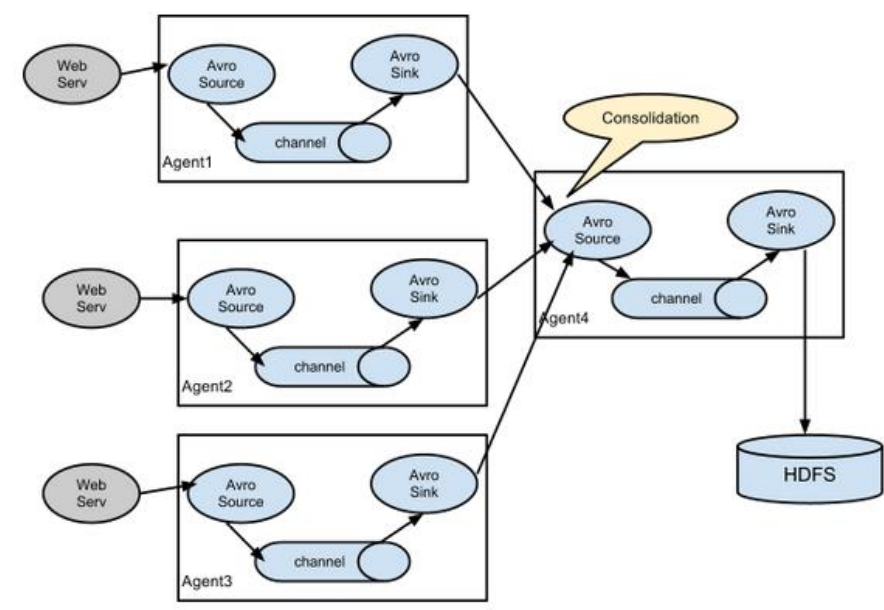
这种模式是我们最常见的,也非常实用,日常 web 应用通常分布在上百个服务器,大者甚至上千个、上万个服务器。产生的日志,处理起来也非常麻烦。用 flume 的这种组合方式能很好的解决这一问题,每台服务器部署一个 flume 采集日志,传送到一个集中收集日志的flume,再由此 flume 上传到 hdfs、hive、hbase 等,进行日志分析。
# 3.4 Flume 企业开发案例
# 3.4.1 复制和多路复用
1)案例需求
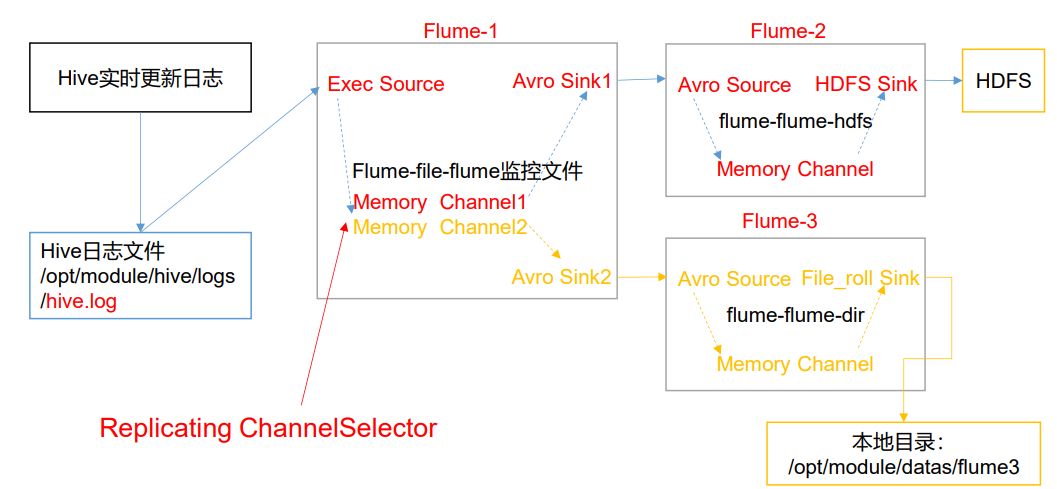
使用 Flume-1 监控文件变动,Flume-1 将变动内容传递给 Flume-2,Flume-2 负责存储到 HDFS。同时 Flume-1 将变动内容传递给 Flume-3,Flume-3 负责输出到 Local FileSystem。
2)需求分析:
Avro[阿弗罗] (轻量级的RPC框架)
Avro是Hadoop中的一个子项目,也是Apache中一个独立的项目,Avro是一个基于二进制数据传输高性能的中间件。在Hadoop的其他项目中例如HBase(Ref)和Hive(Ref)的Client端与服务端的数据传输也采用了这个工具。Avro是一个数据序列化的系统。Avro 可以将数据结构或对象转化成便于存储或传输的格式。Avro设计之初就用来支持数据密集型应用,适合于远程或本地大规模数据的存储和交换。
https://www.likecs.com/show-204620943.html
3)实现步骤:
(1)准备工作
在/opt/module/flume/job 目录下创建 group1 文件夹
[atguigu@hadoop102 job]$ cd group1/
在/opt/module/datas/目录下创建 flume3 文件夹
[atguigu@hadoop102 datas]$ mkdir flume3
(2)创建 flume-file-flume.conf
配置 1 个接收日志文件的 source 和两个 channel、两个 sink,分别输送给 flume-flume-hdfs 和 flume-flume-dir。
编辑配置文件
[atguigu@hadoop102 group1]$ vim flume-file-flume.conf
添加如下内容
# Name the components on this agent
a1.sources = r1
a1.sinks = k1 k2
a1.channels = c1 c2
# 将数据流复制给所有 channel
a1.sources.r1.selector.type = replicating
# Describe/configure the source
a1.sources.r1.type = exec
a1.sources.r1.command = tail -F /opt/module/hive/logs/hive.log
a1.sources.r1.shell = /bin/bash -c
# Describe the sink
# sink 端的 avro 是一个数据发送者
a1.sinks.k1.type = avro
a1.sinks.k1.hostname = hadoop102
a1.sinks.k1.port = 4141
a1.sinks.k2.type = avro
a1.sinks.k2.hostname = hadoop102
a1.sinks.k2.port = 4142
# Describe the channel
a1.channels.c1.type = memory
a1.channels.c1.capacity = 1000
a1.channels.c1.transactionCapacity = 100
a1.channels.c2.type = memory
a1.channels.c2.capacity = 1000
a1.channels.c2.transactionCapacity = 100
# Bind the source and sink to the channel
a1.sources.r1.channels = c1 c2
a1.sinks.k1.channel = c1
a1.sinks.k2.channel = c2
2
3
4
5
6
7
8
9
10
11
12
13
14
15
16
17
18
19
20
21
22
23
24
25
26
27
28
29
(3)创建 flume-flume-hdfs.conf
配置上级 Flume 输出的 Source,输出是到 HDFS 的 Sink。
编辑配置文件
[atguigu@hadoop102 group1]$ vim flume-flume-hdfs.conf
添加如下内容
# Name the components on this agent
a2.sources = r1
a2.sinks = k1
a2.channels = c1
# Describe/configure the source
# source 端的 avro 是一个数据接收服务
a2.sources.r1.type = avro
a2.sources.r1.bind = hadoop102
a2.sources.r1.port = 4141
# Describe the sink
a2.sinks.k1.type = hdfs
a2.sinks.k1.hdfs.path = hdfs://hadoop102:9820/flume2/%Y%m%d/%H
#上传文件的前缀
a2.sinks.k1.hdfs.filePrefix = flume2-
#是否按照时间滚动文件夹
a2.sinks.k1.hdfs.round = true
#多少时间单位创建一个新的文件夹
a2.sinks.k1.hdfs.roundValue = 1
#重新定义时间单位
a2.sinks.k1.hdfs.roundUnit = hour
#是否使用本地时间戳
a2.sinks.k1.hdfs.useLocalTimeStamp = true
#积攒多少个 Event 才 flush 到 HDFS 一次
a2.sinks.k1.hdfs.batchSize = 100
#设置文件类型,可支持压缩
a2.sinks.k1.hdfs.fileType = DataStream
#多久生成一个新的文件
a2.sinks.k1.hdfs.rollInterval = 30
#设置每个文件的滚动大小大概是 128M
a2.sinks.k1.hdfs.rollSize = 134217700
#文件的滚动与 Event 数量无关
a2.sinks.k1.hdfs.rollCount = 0
# Describe the channel
a2.channels.c1.type = memory
a2.channels.c1.capacity = 1000
a2.channels.c1.transactionCapacity = 100
# Bind the source and sink to the channel
a2.sources.r1.channels = c1
a2.sinks.k1.channel = c1
2
3
4
5
6
7
8
9
10
11
12
13
14
15
16
17
18
19
20
21
22
23
24
25
26
27
28
29
30
31
32
33
34
35
36
37
38
39
(4)创建 flume-flume-dir.conf
配置上级 Flume 输出的 Source,输出是到本地目录的 Sink。
编辑配置文件
[atguigu@hadoop102 group1]$ vim flume-flume-dir.conf
添加如下内容
# Name the components on this agent
a3.sources = r1
a3.sinks = k1
a3.channels = c2
# Describe/configure the source
a3.sources.r1.type = avro
a3.sources.r1.bind = hadoop102
a3.sources.r1.port = 4142
# Describe the sink
a3.sinks.k1.type = file_roll
a3.sinks.k1.sink.directory = /opt/module/data/flume3
# Describe the channel
a3.channels.c2.type = memory
a3.channels.c2.capacity = 1000
a3.channels.c2.transactionCapacity = 100
# Bind the source and sink to the channel
a3.sources.r1.channels = c2
a3.sinks.k1.channel = c2
2
3
4
5
6
7
8
9
10
11
12
13
14
15
16
17
18
提示:输出的本地目录必须是已经存在的目录,如果该目录不存在,并不会创建新的目 录。
(5)执行配置文件
分别启动对应的 flume 进程:flume-flume-dir,flume-flume-hdfs,flume-file-flume。
[atguigu@hadoop102 flume]$ bin/flume-ng agent --conf conf/ --name
a3 --conf-file job/group1/flume-flume-dir.conf
[atguigu@hadoop102 flume]$ bin/flume-ng agent --conf conf/ --name
a2 --conf-file job/group1/flume-flume-hdfs.conf
[atguigu@hadoop102 flume]$ bin/flume-ng agent --conf conf/ --name
a1 --conf-file job/group1/flume-file-flume.conf
2
3
4
5
6
(6)启动 Hadoop 和 Hive
[atguigu@hadoop102 hadoop-2.7.2]$ sbin/start-dfs.sh
[atguigu@hadoop103 hadoop-2.7.2]$ sbin/start-yarn.sh
[atguigu@hadoop102 hive]$ bin/hive
hive (default)>
2
3
4
(7)检查 HDFS 上数据

(8)检查/opt/module/datas/flume3 目录中数据
[atguigu@hadoop102 flume3]$ ll
总用量 8
-rw-rw-r--. 1 atguigu atguigu 5942 5 月 22 00:09 1526918887550-3
2
3
# 3.4.2 负载均衡和故障转移
1)案例需求
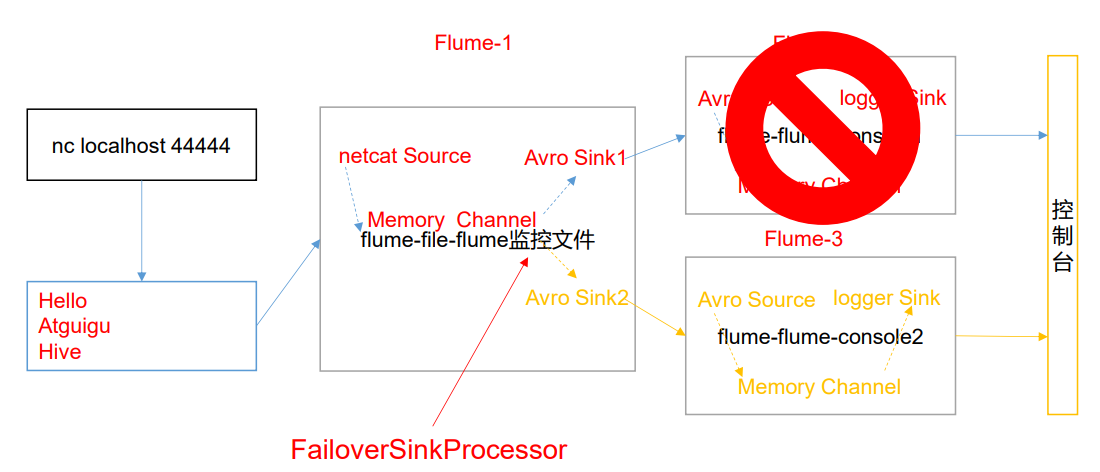
使用 Flume1 监控一个端口,其 sink 组中的 sink 分别对接 Flume2 和 Flume3,采用 FailoverSinkProcessor,实现故障转移的功能。
2)需求分析
3)实现步骤
(1)准备工作
在/opt/module/flume/job 目录下创建 group2 文件夹
(2)创建 flume-netcat-flume.conf
配置 1 个 netcat source 和 1 个 channel、1 个 sink group(2 个 sink),分别输送给 flume-flume-console1 和 flume-flume-console2。
编辑配置文件
[atguigu@hadoop102 group2]$ vim flume-netcat-flume.conf
添加如下内容
# Name the components on this agent
a1.sources = r1
a1.channels = c1
a1.sinkgroups = g1
a1.sinks = k1 k2
# Describe/configure the source
a1.sources.r1.type = netcat
a1.sources.r1.bind = localhost
a1.sources.r1.port = 44444
a1.sinkgroups.g1.processor.type = failover
a1.sinkgroups.g1.processor.priority.k1 = 5
a1.sinkgroups.g1.processor.priority.k2 = 10
a1.sinkgroups.g1.processor.maxpenalty = 10000
# Describe the sink
a1.sinks.k1.type = avro
a1.sinks.k1.hostname = hadoop102
a1.sinks.k1.port = 4141

a1.sinks.k2.type = avro
a1.sinks.k2.hostname = hadoop102
a1.sinks.k2.port = 4142
# Describe the channel
a1.channels.c1.type = memory
a1.channels.c1.capacity = 1000
a1.channels.c1.transactionCapacity = 100
# Bind the source and sink to the channel
a1.sources.r1.channels = c1
a1.sinkgroups.g1.sinks = k1 k2
a1.sinks.k1.channel = c1
a1.sinks.k2.channel = c1
2
3
4
5
6
7
8
9
10
11
12
13
14
15
16
17
18
19
20
21
22
23
24
25
26
27
28
29
30
(3)创建 flume-flume-console1.conf
配置上级 Flume 输出的 Source,输出是到本地控制台。
编辑配置文
[atguigu@hadoop102 group2]$ vim flume-flume-console1.conf
添加如下内容
# Name the components on this agent
a2.sources = r1
a2.sinks = k1
a2.channels = c1
# Describe/configure the source
a2.sources.r1.type = avro
a2.sources.r1.bind = hadoop102
a2.sources.r1.port = 4141
# Describe the sink
a2.sinks.k1.type = logger
# Describe the channel
a2.channels.c1.type = memory
a2.channels.c1.capacity = 1000
a2.channels.c1.transactionCapacity = 100
# Bind the source and sink to the channel
a2.sources.r1.channels = c1
a2.sinks.k1.channel = c1
2
3
4
5
6
7
8
9
10
11
12
13
14
15
16
17
(4)创建 flume-flume-console2.conf
配置上级 Flume 输出的 Source,输出是到本地控制台。
编辑配置文件
[atguigu@hadoop102 group2]$ vim flume-flume-console2.conf
添加如下内容
# Name the components on this agent
a3.sources = r1
a3.sinks = k1
a3.channels = c2

# Describe/configure the source
a3.sources.r1.type = avro
a3.sources.r1.bind = hadoop102
a3.sources.r1.port = 4142
# Describe the sink
a3.sinks.k1.type = logger
# Describe the channel
a3.channels.c2.type = memory
a3.channels.c2.capacity = 1000
a3.channels.c2.transactionCapacity = 100
# Bind the source and sink to the channel
a3.sources.r1.channels = c2
a3.sinks.k1.channel = c2
2
3
4
5
6
7
8
9
10
11
12
13
14
15
16
17
18
(5)执行配置文件
分别开启对应配置文件:flume-flume-console2,flume-flume-console1,flume-netcat-flume
[atguigu@hadoop102 flume]$ bin/flume-ng agent --conf conf/ --name
a3 --conf-file job/group2/flume-flume-console2.conf -
Dflume.root.logger=INFO,console
[atguigu@hadoop102 flume]$ bin/flume-ng agent --conf conf/ --name
a2 --conf-file job/group2/flume-flume-console1.conf -
Dflume.root.logger=INFO,console
[atguigu@hadoop102 flume]$ bin/flume-ng agent --conf conf/ --name
a1 --conf-file job/group2/flume-netcat-flume.conf
2
3
4
5
6
7
8
(6)使用 netcat 工具向本机的 44444 端口发送内容
$ nc localhost 44444
(7)查看 Flume2 及 Flume3 的控制台打印日志
(8)将 Flume2 kill,观察 Flume3 的控制台打印情况。
注:使用 jps -ml 查看 Flume 进程。
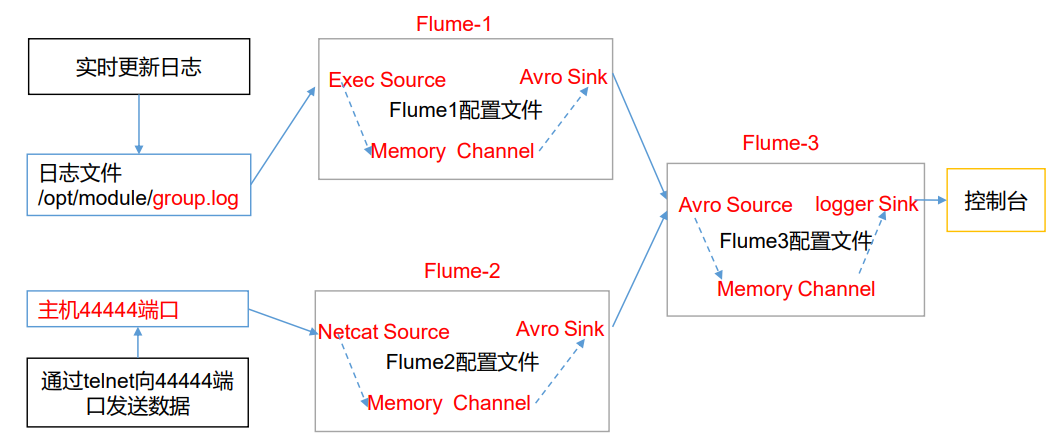
# 3.4.3 聚合
1)案例需求:
hadoop102 上的 Flume-1 监控文件/opt/module/group.log,
hadoop103 上的 Flume-2 监控某一个端口的数据流,
Flume-1 与 Flume-2 将数据发送给 hadoop104 上的 Flume-3,Flume-3 将最终数据打印到控制台。
2)需求分析
3)实现步骤:
(1)准备工作
分发 Flume
[atguigu@hadoop102 module]$ xsync flume
在 hadoop102、hadoop103 以及 hadoop104 的/opt/module/flume/job 目录下创建一个 group3 文件夹。
[atguigu@hadoop102 job]$ mkdir group3
[atguigu@hadoop103 job]$ mkdir group3
[atguigu@hadoop104 job]$ mkdir group3
2
3
(2)创建 flume1-logger-flume.conf
配置 Source 用于监控 hive.log 文件,配置 Sink 输出数据到下一级 Flume。
在 hadoop102 上编辑配置文件
[atguigu@hadoop102 group3]$ vim flume1-logger-flume.conf
添加如下内容
# Name the components on this agent
a1.sources = r1
a1.sinks = k1
a1.channels = c1
# Describe/configure the source
a1.sources.r1.type = exec
a1.sources.r1.command = tail -F /opt/module/group.log
a1.sources.r1.shell = /bin/bash -c
# Describe the sink
a1.sinks.k1.type = avro
a1.sinks.k1.hostname = hadoop104
a1.sinks.k1.port = 4141

# Describe the channel
a1.channels.c1.type = memory
a1.channels.c1.capacity = 1000
a1.channels.c1.transactionCapacity = 100
# Bind the source and sink to the channel
a1.sources.r1.channels = c1
a1.sinks.k1.channel = c1
2
3
4
5
6
7
8
9
10
11
12
13
14
15
16
17
18
19
20
(3)创建 flume2-netcat-flume.conf
配置 Source 监控端口 44444 数据流,配置 Sink 数据到下一级 Flume:
在 hadoop103 上编辑配置文
[atguigu@hadoop102 group3]$ vim flume2-netcat-flume.conf
添加如下内容
# Name the components on this agent
a2.sources = r1
a2.sinks = k1
a2.channels = c1
# Describe/configure the source
a2.sources.r1.type = netcat
a2.sources.r1.bind = hadoop103
a2.sources.r1.port = 44444
# Describe the sink
a2.sinks.k1.type = avro
a2.sinks.k1.hostname = hadoop104
a2.sinks.k1.port = 4141
# Use a channel which buffers events in memory
a2.channels.c1.type = memory
a2.channels.c1.capacity = 1000
a2.channels.c1.transactionCapacity = 100
# Bind the source and sink to the channel
a2.sources.r1.channels = c1
a2.sinks.k1.channel = c1
2
3
4
5
6
7
8
9
10
11
12
13
14
15
16
17
18
19
(4)创建 flume3-flume-logger.conf
配置 source 用于接收 flume1 与 flume2 发送过来的数据流,最终合并后 sink 到控制台。
在 hadoop104 上编辑配置文件
[atguigu@hadoop104 group3]$ touch flume3-flume-logger.conf
[atguigu@hadoop104 group3]$ vim flume3-flume-logger.conf
2
3
添加如下内容
# Name the components on this agent
a3.sources = r1
a3.sinks = k1
a3.channels = c1
# Describe/configure the source
a3.sources.r1.type = avro

a3.sources.r1.bind = hadoop104
a3.sources.r1.port = 4141
# Describe the sink
# Describe the sink
a3.sinks.k1.type = logger

# Describe the channel
a3.channels.c1.type = memory
a3.channels.c1.capacity = 1000
a3.channels.c1.transactionCapacity = 100

# Bind the source and sink to the channel
a3.sources.r1.channels = c1
a3.sinks.k1.channel = c1
2
3
4
5
6
7
8
9
10
11
12
13
14
15
16
17
18
19
20
21
(5)执行配置文件
分别开启对应配置文件:flume3-flume-logger.conf,flume2-netcat-flume.conf, flume1-logger-flume.conf。
[atguigu@hadoop104 flume]$ bin/flume-ng agent --conf conf/ --name
a3 --conf-file job/group3/flume3-flume-logger.conf -
Dflume.root.logger=INFO,console
[atguigu@hadoop102 flume]$ bin/flume-ng agent --conf conf/ --name
a2 --conf-file job/group3/flume1-logger-flume.conf
[atguigu@hadoop103 flume]$ bin/flume-ng agent --conf conf/ --name
a1 --conf-file job/group3/flume2-netcat-flume.conf
2
3
4
5
6
7
(6)在 hadoop103 上向/opt/module 目录下的 group.log 追加内容
[atguigu@hadoop103 module]$ echo 'hello' > group.log
(7)在 hadoop102 上向 44444 端口发送数据
[atguigu@hadoop102 flume]$ telnet hadoop102 44444
(8)检查 hadoop104 上数据
# 3.5 自定义 Interceptor
1)案例需求
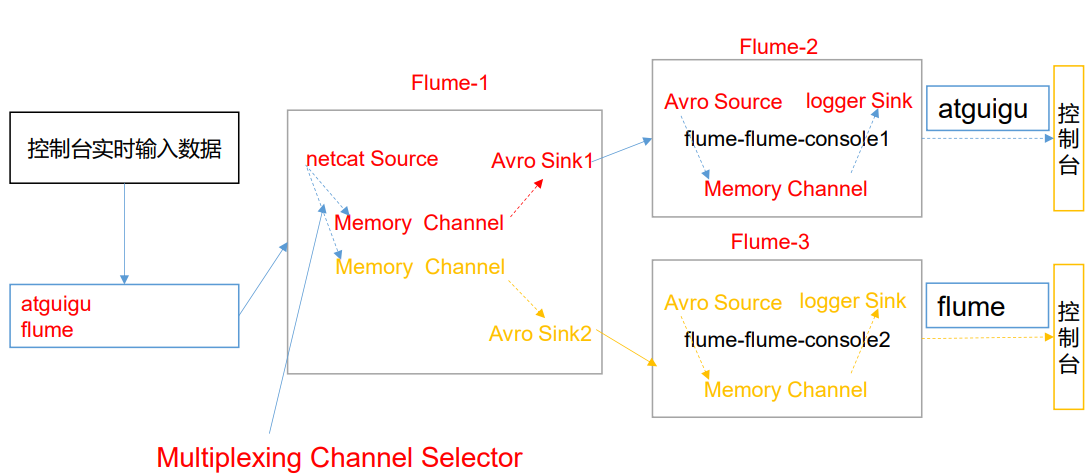
使用 Flume 采集服务器本地日志,需要按照日志类型的不同,将不同种类的日志发往不同的分析系统。
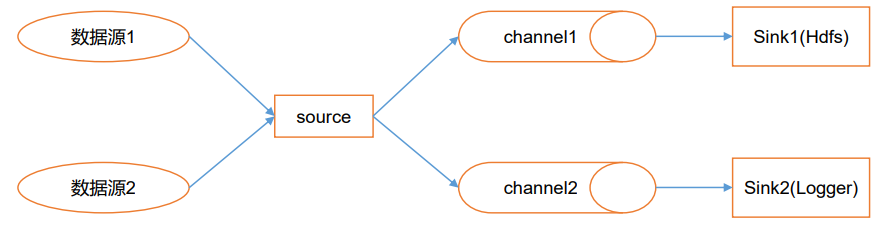
2)需求分析
在实际的开发中,一台服务器产生的日志类型可能有很多种,不同类型的日志可能需要发送到不同的分析系统。此时会用到 Flume 拓扑结构中的 Multiplexing 结构,Multiplexing 的原理是,根据 event 中 Header 的某个 key 的值,将不同的 event 发送到不同的 Channel中,所以我们需要自定义一个 Interceptor,为不同类型的 event 的 Header 中的 key 赋予不同的值。
在该案例中,我们以端口数据模拟日志,以是否包含”atguigu”模拟不同类型的日志, 我们需要自定义 interceptor 区分数据中是否包含”atguigu”,将其分别发往不同的分析 系统(Channel)。
3)实现步骤
(1)创建一个 maven 项目,并引入以下依赖。
<dependency>
 <groupId>org.apache.flume</groupId>
 <artifactId>flume-ng-core</artifactId>
 <version>1.9.0</version>
</dependency
2
3
4
5
(2)定义 CustomInterceptor 类并实现 Interceptor 接口。
package com.atguigu.interceptor;
import org.apache.flume.Context;
import org.apache.flume.Event;
import org.apache.flume.interceptor.Interceptor;
import java.util.ArrayList;
import java.util.List;
import java.util.Map;
public class TypeInterceptor implements Interceptor {
     //声明一个存放事件的集合
     private List<Event> addHeaderEvents;
     @Override
      public void initialize() {
         //初始化存放事件的集合
         addHeaderEvents = new ArrayList<>();
     }
     //单个事件拦截
     @Override
     public Event intercept(Event event) {
         //1.获取事件中的头信息
         Map<String, String> headers = event.getHeaders();
         //2.获取事件中的 body 信息
         String body = new String(event.getBody());
         //3.根据 body 中是否有"atguigu"来决定添加怎样的头信息
         if (body.contains("atguigu")) {
         //4.添加头信息
         	headers.put("type", "first");
         } else {
         //4.添加头信息
         	headers.put("type", "second");
         }
         return event;
     }

     //批量事件拦截
     @Override
     public List<Event> intercept(List<Event> events) {
         //1.清空集合
         addHeaderEvents.clear();
         //2.遍历 events
         for (Event event : events) {
         	//3.给每一个事件添加头信息
         	addHeaderEvents.add(intercept(event));
         }
         //4.返回结果
         return addHeaderEvents;
     }

     @Override
     public void close() {
     }

     public static class Builder implements Interceptor.Builder {

         @Override
         public Interceptor build() {
         	return new TypeInterceptor();
         }

 		@Override
		public void configure(Context context) {
 		}
 	}
}
2
3
4
5
6
7
8
9
10
11
12
13
14
15
16
17
18
19
20
21
22
23
24
25
26
27
28
29
30
31
32
33
34
35
36
37
38
39
40
41
42
43
44
45
46
47
48
49
50
51
52
53
54
55
56
57
58
59
60
61
62
63
(3)编辑 flume 配置文件
为 hadoop102 上的 Flume1 配置 1 个 netcat source,1 个 sink group(2 个 avro sink), 并配置相应的 ChannelSelector 和 interceptor。
# Name the components on this agent
a1.sources = r1
a1.sinks = k1 k2
a1.channels = c1 c2

# Describe/configure the source
a1.sources.r1.type = netcat
a1.sources.r1.bind = localhost
a1.sources.r1.port = 44444
a1.sources.r1.interceptors = i1
a1.sources.r1.interceptors.i1.type = com.atguigu.flume.interceptor.CustomInterceptor$Builder
a1.sources.r1.selector.type = multiplexing
a1.sources.r1.selector.header = type
a1.sources.r1.selector.mapping.first = c1
a1.sources.r1.selector.mapping.second = c2

# Describe the sink
a1.sinks.k1.type = avro
a1.sinks.k1.hostname = hadoop103
a1.sinks.k1.port = 4141
a1.sinks.k2.type=avro
a1.sinks.k2.hostname = hadoop104
a1.sinks.k2.port = 4242

# Use a channel which buffers events in memory
a1.channels.c1.type = memory
a1.channels.c1.capacity = 1000
a1.channels.c1.transactionCapacity = 100

# Use a channel which buffers events in memory
a1.channels.c2.type = memory
a1.channels.c2.capacity = 1000
a1.channels.c2.transactionCapacity = 100

# Bind the source and sink to the channel
a1.sources.r1.channels = c1 c2
a1.sinks.k1.channel = c1
a1.sinks.k2.channel = c2
2
3
4
5
6
7
8
9
10
11
12
13
14
15
16
17
18
19
20
21
22
23
24
25
26
27
28
29
30
31
32
33
34
35
36
37
38
为 hadoop103 上的 Flume4 配置一个 avro source 和一个 logger sink。
a1.sources = r1
a1.sinks = k1
a1.channels = c1

a1.sources.r1.type = avro
a1.sources.r1.bind = hadoop103
a1.sources.r1.port = 4141

a1.sinks.k1.type = logger

a1.channels.c1.type = memory
a1.channels.c1.capacity = 1000
a1.channels.c1.transactionCapacity = 100

a1.sinks.k1.channel = c1
a1.sources.r1.channels = c1
2
3
4
5
6
7
8
9
10
11
12
13
14
15
16
为 hadoop104 上的 Flume3 配置一个 avro source 和一个 logger sink。
a1.sources = r1
a1.sinks = k1
a1.channels = c1

a1.sources.r1.type = avro
a1.sources.r1.bind = hadoop104
a1.sources.r1.port = 4242

a1.sinks.k1.type = logger
a1.channels.c1.type = memory
a1.channels.c1.capacity = 1000
a1.channels.c1.transactionCapacity = 100

a1.sinks.k1.channel = c1
a1.sources.r1.channels = c1
2
3
4
5
6
7
8
9
10
11
12
13
14
15
(4)分别在 hadoop102,hadoop103,hadoop104 上启动 flume 进程,注意先后顺序。
(5)在 hadoop102 使用 netcat 向 localhost:44444 发送字母和数字。
(6)观察 hadoop103 和 hadoop104 打印的日志。
# 3.6 自定义 Source
# 1)介绍
Source 是负责接收数据到 Flume Agent 的组件。Source 组件可以处理各种类型、各种格式的日志数据,包括 avro、thrift、exec、jms、spooling directory、netcat、sequence generator、syslog、http、legacy。官方提供的 source 类型已经很多,但是有时候并不能满足实际开发当中的需求,此时我们就需要根据实际需求自定义某些 source。
官方也提供了自定义 source 的接口:
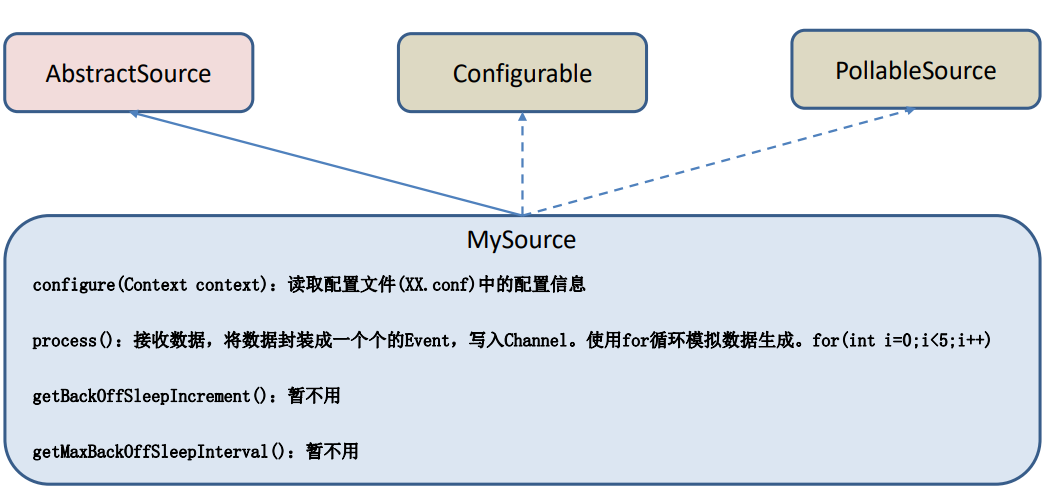
https://flume.apache.org/FlumeDeveloperGuide.html#source 根据官方说明自定义 MySource 需要继承 AbstractSource 类并实现 Configurable 和 PollableSource 接口。
实现相应方法:
getBackOffSleepIncrement() //backoff 步长
getMaxBackOffSleepInterval()//backoff 最长时间
configure(Context context)//初始化 context(读取配置文件内容)
process()//获取数据封装成 event 并写入 channel,这个方法将被循环调用。
使用场景:读取 MySQL 数据或者其他文件系统。
# 2)需求
使用 flume 接收数据,并给每条数据添加前缀,输出到控制台。前缀可从 flume 配置文件中配置。
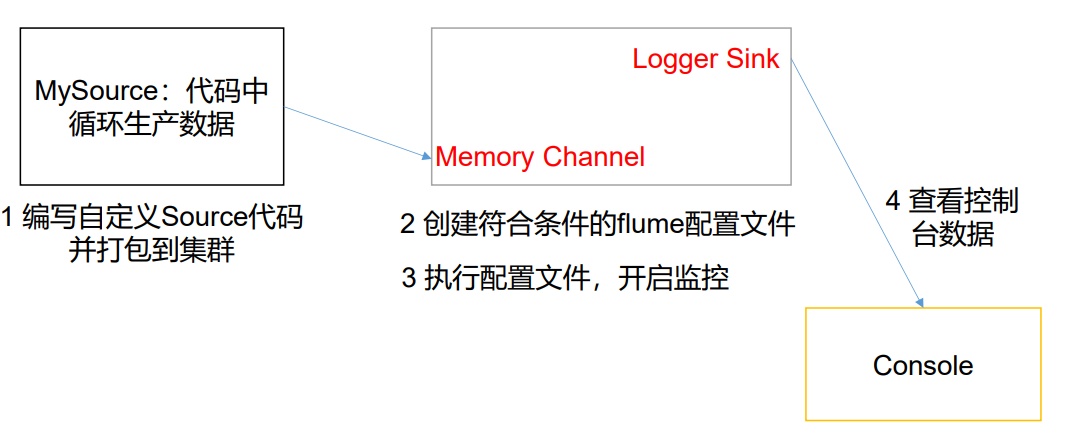
# 3)分析
# 4)编码
(1)导入 pom 依赖
<dependency>
 <groupId>org.apache.flume</groupId>
 <artifactId>flume-ng-core</artifactId>
 <version>1.9.0</version>
</dependency>
2
3
4
5
(2)编写代码
import org.apache.flume.Context;
import org.apache.flume.EventDeliveryException;
import org.apache.flume.PollableSource;
import org.apache.flume.conf.Configurable;
import org.apache.flume.event.SimpleEvent;
import org.apache.flume.source.AbstractSource;
import java.util.HashMap;
public class MySource extends AbstractSource implements Configurable, PollableSource {

 //定义配置文件将来要读取的字段
 private Long delay;
 private String field;

 //初始化配置信息
 @Override
 public void configure(Context context) {
     delay = context.getLong("delay");
     field = context.getString("field", "Hello!");
 }

 @Override
 public Status process() throws EventDeliveryException {

 try {
     //创建事件头信息
     HashMap<String, String> hearderMap = new HashMap<>();
     //创建事件
     SimpleEvent event = new SimpleEvent();
     //循环封装事件
     for (int i = 0; i < 5; i++) {
         //给事件设置头信息
         event.setHeaders(hearderMap);
         //给事件设置内容
         event.setBody((field + i).getBytes());
         //将事件写入 channel
         getChannelProcessor().processEvent(event);
         Thread.sleep(delay);
     	}
     } catch (Exception e) {
        e.printStackTrace();
        return Status.BACKOFF;
     }

    return Status.READY;
  }

 @Override
 public long getBackOffSleepIncrement() {
	return 0;
 }

 @Override
 public long getMaxBackOffSleepInterval() {
 	return 0;
 }
}
2
3
4
5
6
7
8
9
10
11
12
13
14
15
16
17
18
19
20
21
22
23
24
25
26
27
28
29
30
31
32
33
34
35
36
37
38
39
40
41
42
43
44
45
46
47
48
49
50
51
52
53
54
55
56
57
5)测试
(1)打包
将写好的代码打包,并放到 flume 的 lib 目录(/opt/module/flume)下。
(2)配置文件
# Name the components on this agent
a1.sources = r1
a1.sinks = k1
a1.channels = c1

# Describe/configure the source
a1.sources.r1.type = com.atguigu.MySource
a1.sources.r1.delay = 1000
#a1.sources.r1.field = atguigu

# Describe the sink
a1.sinks.k1.type = logger

# Use a channel which buffers events in memory
a1.channels.c1.type = memory
a1.channels.c1.capacity = 1000
a1.channels.c1.transactionCapacity = 100

# Bind the source and sink to the channel
a1.sources.r1.channels = c1
a1.sinks.k1.channel = c1
2
3
4
5
6
7
8
9
10
11
12
13
14
15
16
17
18
19
20
21
(3)开启任务
[atguigu@hadoop102 flume]$ pwd
/opt/module/flume
[atguigu@hadoop102 flume]$ bin/flume-ng agent -c conf/ -f
job/mysource.conf -n a1 -Dflume.root.logger=INFO,console
2
3
4
(4)结果展示
# 3.7 自定义 Sink
# 1)介绍
Sink 不断地轮询 Channel 中的事件且批量地移除它们,并将这些事件批量写入到存储或索引系统、或者被发送到另一个 Flume Agent。
Sink 是完全事务性的。在从 Channel 批量删除数据之前,每个 Sink 用 Channel 启动一 个事务。批量事件一旦成功写出到存储系统或下一个 Flume Agent,Sink 就利用 Channel 提交事务。事务一旦被提交,该 Channel 从自己的内部缓冲区删除事件。
Sink 组件目的地包括 hdfs、logger、avro、thrift、ipc、file、null、HBase、solr、 自定义。官方提供的 Sink 类型已经很多,但是有时候并不能满足实际开发当中的需求,此 时我们就需要根据实际需求自定义某些 Sink。
官方也提供了自定义 sink 的接口:
https://flume.apache.org/FlumeDeveloperGuide.html#sink 根据官方说明自定义 MySink 需要继承 AbstractSink 类并实现 Configurable 接口。
实现相应方法:
configure(Context context)//初始化 context(读取配置文件内容)
process()//从 Channel 读取获取数据(event),这个方法将被循环调用。
使用场景:读取 Channel 数据写入 MySQL 或者其他文件系统。
# 2)需求
使用 flume 接收数据,并在 Sink 端给每条数据添加前缀和后缀,输出到控制台。前后缀可在 flume 任务配置文件中配置。
流程分析:
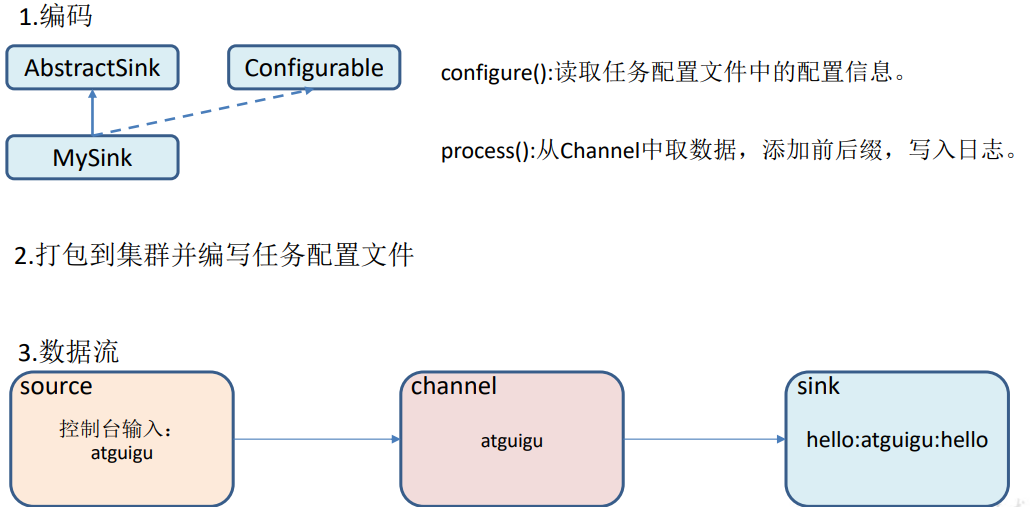
# 3)编码
import org.apache.flume.*;
import org.apache.flume.conf.Configurable;
import org.apache.flume.sink.AbstractSink;
import org.slf4j.Logger;
import org.slf4j.LoggerFactory;

public class MySink extends AbstractSink implements Configurable {

 //创建 Logger 对象
 private static final Logger LOG = LoggerFactory.getLogger(AbstractSink.class);
 private String prefix;
 private String suffix;

 @Override
 public Status process() throws EventDeliveryException {
     //声明返回值状态信息
     Status status;
     //获取当前 Sink 绑定的 Channel
     Channel ch = getChannel();
     //获取事务
     Transaction txn = ch.getTransaction();
     //声明事件
     Event event;
     //开启事务
     txn.begin();

     //读取 Channel 中的事件,直到读取到事件结束循环
     while (true) {
         event = ch.take();
         if (event != null) {
         	break;
         }
 	}

     try {
         //处理事件(打印)
         LOG.info(prefix + new String(event.getBody()) + suffix);
         //事务提交
         txn.commit();
         status = Status.READY;
     } catch (Exception e) {
         //遇到异常,事务回滚
         txn.rollback();
         status = Status.BACKOFF;
     } finally {
         //关闭事务
         txn.close();
     }
     return status;
 }

 @Override
 public void configure(Context context) {
 //读取配置文件内容,有默认值
 prefix = context.getString("prefix", "hello:");
 //读取配置文件内容,无默认值
 suffix = context.getString("suffix");
 }
}
2
3
4
5
6
7
8
9
10
11
12
13
14
15
16
17
18
19
20
21
22
23
24
25
26
27
28
29
30
31
32
33
34
35
36
37
38
39
40
41
42
43
44
45
46
47
48
49
50
51
52
53
54
55
56
57
58
59
# 4)测试
(1)打包
将写好的代码打包,并放到 flume 的 lib 目录(/opt/module/flume)下。
(2)配置文件
# Name the components on this agent
a1.sources = r1
a1.sinks = k1
a1.channels = c1

# Describe/configure the source
a1.sources.r1.type = netcat
a1.sources.r1.bind = localhost
a1.sources.r1.port = 4444

# Describe the sink
a1.sinks.k1.type = com.atguigu.MySink
#a1.sinks.k1.prefix = atguigu:
a1.sinks.k1.suffix = :atguigu

# Use a channel which buffers events in memory
a1.channels.c1.type = memory
a1.channels.c1.capacity = 1000
a1.channels.c1.transactionCapacity = 100

# Bind the source and sink to the channel
a1.sources.r1.channels = c1
a1.sinks.k1.channel = c1
2
3
4
5
6
7
8
9
10
11
12
13
14
15
16
17
18
19
20
21
22
23
(3)开启任务
[atguigu@hadoop102 flume]$ bin/flume-ng agent -c conf/ -f
job/mysink.conf -n a1 -Dflume.root.logger=INFO,console
[atguigu@hadoop102 ~]$ nc localhost 44444
hello
OK
atguigu
OK
2
3
4
5
6
7
(4)结果展示

#
# 第 4 章 企业真实面试题(重点)
# 4.1 你是如何实现 Flume 数据传输的监控的
使用第三方框架 Ganglia 实时监控 Flume。
# 4.2 Flume 的 Source,Sink,Channel 的作用?你们 Source 是什么类 型?
1)作用
- (1)Source 组件是专门用来收集数据的,可以处理各种类型、各种格式的日志数据, 包括 avro、thrift、exec、jms、spooling directory、netcat、sequence generator、syslog、 http、legacy
- (2)Channel 组件对采集到的数据进行缓存,可以存放在 Memory 或 File 中。
- (3)Sink 组件是用于把数据发送到目的地的组件,目的地包括 Hdfs、Logger、avro、 thrift、ipc、file、Hbase、solr、自定义。
2)我公司采用的 Source 类型为:
- (1)监控后台日志:exec
- (2)监控后台产生日志的端口:netcat
# 4.3 Flume 的 Channel Selectors
 Channel Selectors,可以让不同的项目日志通过不同的Channel到不同的Sink中去。
官方文档上Channel Selectors 有两种类型:Replicating Channel Selector (default)和 Multiplexing Channel Selector
这两种Selector的区别是:Replicating 会 将source过来的events发往所有channel,而 Multiplexing可以选择该发往哪些Channel。
# 4.4 Flume 参数调优
1)Source
增加 Source 个(使用 Tair Dir Source 时可增加 FileGroups 个数)可以增大 Source 的读取数据的能力。例如:当某一个目录产生的文件过多时需要将这个文件目录拆分成多个 文件目录,同时配置好多个 Source 以保证 Source 有足够的能力获取到新产生的数据。
batchSize 参数决定 Source 一次批量运输到 Channel 的 event 条数,适当调大这个参数可以提高 Source 搬运 Event 到 Channel 时的性能。
2)Channel
type 选择 memory 时 Channel 的性能最好,但是如果 Flume 进程意外挂掉可能会丢失数据。type 选择 file 时 Channel 的容错性更好,但是性能上会比 memory channel 差。
使用 file Channel 时 dataDirs 配置多个不同盘下的目录可以提高性能。
Capacity 参数决定 Channel 可容纳最大的 event 条数。transactionCapacity 参数决定每次 Source 往 channel 里面写的最大 event 条数和每次 Sink 从 channel 里面读的最大 event 条数。transactionCapacity 需要大于 Source 和 Sink 的 batchSize 参数。
3)Sink
增加 Sink 的个数可以增加 Sink 消费 event 的能力。Sink 也不是越多越好够用就行,过多的 Sink 会占用系统资源,造成系统资源不必要的浪费。
batchSize 参数决定 Sink 一次批量从 Channel 读取的 event 条数,适当调大这个参数可以提高 Sink 从 Channel 搬出 event 的性能。
# 4.5 Flume 的事务机制
Flume 的事务机制(类似数据库的事务机制):Flume 使用两个独立的事务分别负责从 Soucrce 到 Channel,以及从 Channel 到 Sink 的事件传递。
比如 spooling directory source 为文件的每一行创建一个事件,一旦事务中所有的事件全部传递到 Channel 且提交成功,那么 Soucrce 就将该文件标记为完成。
同理,事务以类似的方式处理从 Channel 到 Sink 的传递过程,如果因为某种原因使得事件无法记录,那么事务将会回滚。且所有的事件都会保持到 Channel 中,等待重新传递。
# 4.6 Flume 采集数据会丢失吗?
根据 Flume 的架构原理,Flume 是不可能丢失数据的,其内部有完善的事务机制, Source 到 Channel 是事务性的,Channel 到 Sink 是事务性的,因此这两个环节不会出现数据的丢失,唯一可能丢失数据的情况是 Channel 采用 memoryChannel,agent 宕机导致数据丢失,或者 Channel 存储数据已满,导致 Source 不再写入,未写入的数据丢失。
Flume 不会丢失数据,但是有可能造成数据的重复,例如数据已经成功由 Sink 发出, 但是没有接收到响应,Sink 会再次发送数据,此时可能会导致数据的重复
- 01
- idea 热部署插件 JRebel 安装及破解,不生效问题解决04-10
- 02
- spark中代码的执行位置(Driver or Executer)12-12
- 03
- 大数据技术之 SparkStreaming12-12